CMYK Separation with GCR Method — How OmniSeps Omni CMYK Works
Learn how OmniSeps Omni CMYK separates full-color artwork into 7 press-ready channels using the GCR method — including underbase white and highlight — directly in Photoshop.
9 Mei 2026
Screen printing a photorealistic, full-color design on a dark shirt? That's where CMYK separation earns its place. Unlike spot color separation — where each distinct color gets its own ink — CMYK breaks any image into four process inks: Cyan, Magenta, Yellow, and Black. Mixed at the right densities, these four inks reproduce millions of colors on fabric.
OmniSeps includes a dedicated Omni CMYK feature that handles this separation automatically, using the GCR (Gray Component Replacement) method to generate clean, press-ready channels directly inside Photoshop.
What is CMYK Separation in Screen Printing?
CMYK separation is the process of splitting a full-color artwork into four individual ink channels — Cyan (C), Magenta (M), Yellow (Y), and Black (K). Each channel represents the exact amount of that ink needed at every point of the design. When printed in sequence on a garment, the four inks combine optically to reproduce the original image.
This is the same principle used in offset printing, adapted for screen printing: each CMYK channel is exposed onto a separate screen and printed layer by layer onto the garment.
CMYK separation works best for:
- Photorealistic artwork with smooth gradients
- Full-color photographs
- Complex illustrations with hundreds of colors
- Designs too complex for traditional spot color separation
Why GCR (Gray Component Replacement)?
GCR stands for Gray Component Replacement. It is a color science technique that improves CMYK separations by replacing the gray component in each color — the part that Cyan, Magenta, and Yellow would have to mix together to create — with Black ink instead.
Consider a neutral gray: without GCR, you would need all three CMY inks stacked at equal densities to produce it. With GCR, the gray is handled by Black alone, reducing total ink load and producing a cleaner result.
Where Does Each Channel Come From?
The CMY channels follow standard color theory — each is derived from its complementary RGB channel: Cyan from Red, Magenta from Green, Yellow from Blue.
The Black (K) channel is different. It is calculated from all three RGB channels simultaneously — capturing the neutral, gray component present across the image. Wherever a color contains equal amounts of all three primaries, that neutral portion is what K represents.
GCR then subtracts the K amount from each CMY channel accordingly. Wherever Black ink will carry the tone, the CMY inks are reduced — eliminating unnecessary triple-ink stacking in shadow and neutral areas. The result is a cleaner, more efficient separation where each ink only does the work it actually needs to do.
Benefits of GCR for Screen Printing
- Reduced ink stacking — less CMY ink under shadow areas means fewer wet-on-wet problems when printing
- Cleaner neutrals and shadows — Black handles neutral tones precisely, where CMY mixing can introduce color casts
- Crisper detail in dark areas — fine detail in dark areas is preserved better than with a pure CMY mix
- Better ink efficiency — lower total ink volume per print, which reduces press issues
OmniSeps' GCR engine is tuned for ink-on-garment results, not offset printing.
What Channels Does Omni CMYK Generate?
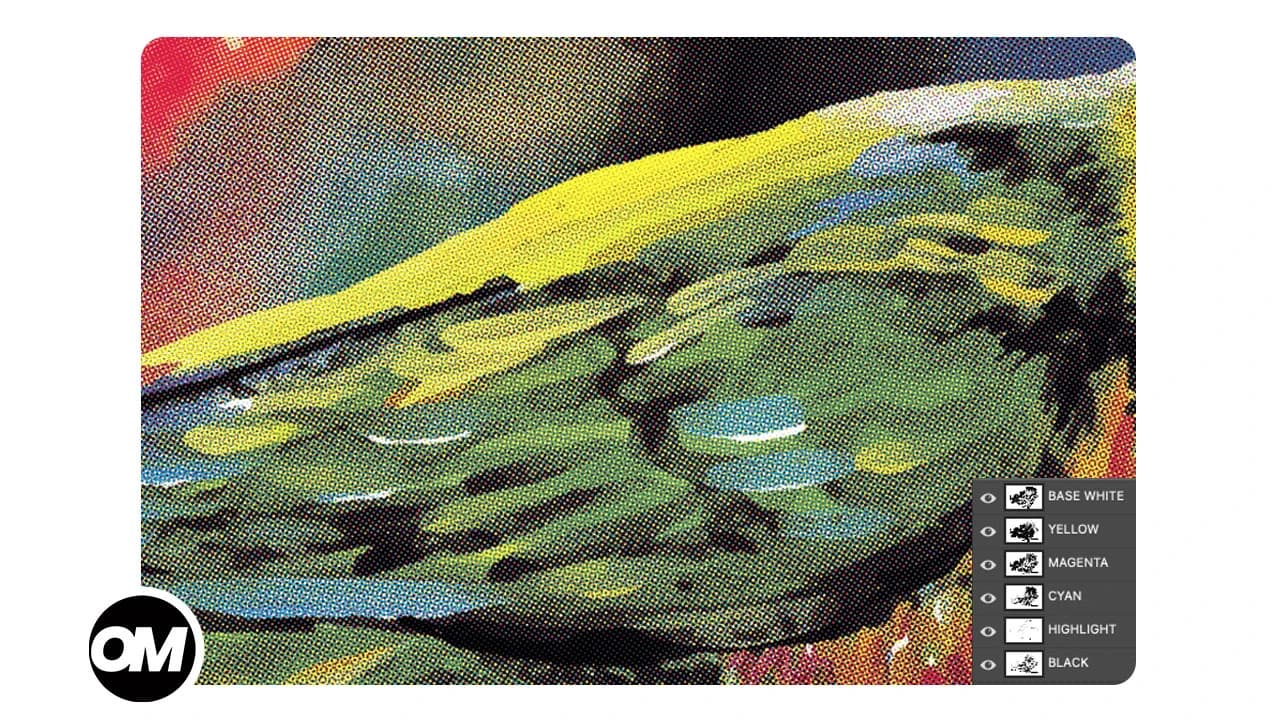
After running Omni CMYK, your Channels panel will show seven channels ready for film output:
- T-Shirt Color — reference channel showing the garment base color for visual preview
- YELLOW — the Yellow ink plate
- MAGENTA — the Magenta ink plate
- CYAN — the Cyan ink plate
- BLACK — the Key plate, built using the GCR method
- BASE WHITE — an underbase white channel derived from the artwork's luminance, for opacity on dark garments
- HIGHLIGHT — a pure white highlight channel that adds brightness and contrast on top of the CMYK layers
This 7-channel output is complete and ready for film or RIP software. No manual channel creation needed.
Dark vs. Light Garments
Omni CMYK always generates all seven channels by default — this is intentional. The full output is optimized for dark garments where an underbase and highlight layer are essential for color accuracy and brightness.
For white shirts, you do not need BASE WHITE or HIGHLIGHT. Simply delete those two channels after the separation is done. CYAN, MAGENTA, YELLOW, and BLACK are all you need for a standard process print on white.
Run the separation once, then remove the channels you don't need based on your garment color.
Layer Requirements Before Separating
Omni CMYK performs a thorough validation before running to prevent bad output. Here is what must be true:
- Document must be in RGB mode — not CMYK, Grayscale, or any other mode. Go to Image > Mode > RGB Color first if needed.
- Exactly one layer must be selected — not zero, not two.
- The layer must be a standard raster layer — not a Group, Smart Object, Text layer, Shape layer, or Fill layer. Rasterize anything that needs it via Layer > Rasterize > Layer.
- The layer must not be locked or hidden — unlock and make it visible before running.
- No Layer Mask or Clipping Mask — apply or remove any masks before separating.
- The layer must not be empty — it must contain actual pixel content.
- Layer name must not be "Layer 1" or "Layer 2" — these names are reserved for internal processing. Rename your design layer first.
- No leftover "OMNI CMYK" or "PREVIEW" layers — delete or rename them if they exist from a previous run.
These checks exist to protect your output. Catching a misconfigured layer upfront saves time.
Non-Destructive Workflow
Omni CMYK is fully non-destructive. Your original design layer is never modified. Here is what happens during the process:
- A duplicate of your layer is created as a working copy
- A second duplicate is saved as PREVIEW — your visual reference after the separation completes
- All channel extraction and processing happens on the working copy
- At the end, the working copy is removed and the PREVIEW layer is restored
Your source artwork is preserved throughout the entire process.
Boost K — Strengthening Shadow Density
After running Omni CMYK, dark areas in the output can sometimes look slightly flat — especially in deep shadows and neutral tones. This is where Boost K comes in.
Boost K is a post-separation tool designed to reinforce shadow density in the CMY channels using the BLACK plate as a reference. It applies the BLACK channel's shadow information back into CYAN, MAGENTA, and YELLOW at controlled opacity levels.
The result: dark areas in the separation gain more depth and richness. Shadows that looked thin or washed out become denser and more saturated when printed.
Boost K requires that CYAN, MAGENTA, YELLOW, and BLACK channels already exist — meaning you must run Omni CMYK first. It is a one-click tool that processes all four channels automatically.
Use Boost K when:
- Shadow areas in your separation look flat or lacking density
- You need richer, more saturated darks without manually adjusting each channel
- You are printing on a dark garment where deep shadows are critical
Fine-Tuning After Separation
Even with a well-tuned automatic separation, some designs benefit from per-channel adjustment. OmniSeps includes a full set of adjustment tools in the Seps panel for this purpose:
- Ink+ — add more density to a channel (darken)
- Ink- — reduce density (lighten)
- Tone+ — cut shadow detail to tighten dark areas
- Tone- — pull back highlights to reduce ink in bright areas
- Choke — shrink the channel edge inward
- Spread — expand the channel edge outward
- Levels — open Photoshop's Levels dialog for that channel
- Brightness/Contrast — open Photoshop's Brightness/Contrast dialog
Each tool operates on exactly one channel at a time — select the channel in the Channels panel first. This gives you precise per-plate control without affecting the rest of the separation.
Frequently Asked Questions
Do I need to convert my document to CMYK mode before using Omni CMYK?
No — the opposite is true. Omni CMYK requires your document to be in RGB mode. If your file is in CMYK mode, convert it to RGB first via Image > Mode > RGB Color before running.
Can I use Omni CMYK on a layered PSD with multiple layers?
You need to merge your artwork to a single raster layer first. Select that one layer, confirm it passes all the checks listed above, then run the separation.
What is BASE WHITE and why is it in the output?
BASE WHITE is an underbase channel — it prints first on dark garments to give the CMYK inks an opaque foundation. Without an underbase, CMYK inks on dark fabric would look muddy and dull.
What is the HIGHLIGHT channel for?
HIGHLIGHT prints pure white on top of the CMYK layers to add brightness and contrast in very light areas of the artwork. It expands the apparent color gamut on dark garments.
Do I need BASE WHITE and HIGHLIGHT when printing on a white shirt?
No. Simply delete those two channels after the separation — CYAN, MAGENTA, YELLOW, and BLACK are sufficient for white garments.
When should I use Boost K?
Use Boost K after running Omni CMYK when shadow areas look flat or lacking density. It reinforces deep shadows in the CMY channels using the BLACK plate as a reference, making dark areas richer and more saturated in print.
Can I run Omni CMYK more than once on the same document?
Yes, but delete or rename any "OMNI CMYK" or "PREVIEW" layers from the previous run first — the validation check will catch these and stop the process.
What happens to my original layer?
It is hidden but preserved. Omni CMYK works entirely on duplicates, so your source artwork is never altered.
Conclusion
Omni CMYK gives screen printers a straightforward path to professional CMYK process separations using the GCR method — a technique that produces cleaner neutral tones, reduces ink stacking, and preserves shadow detail better than a pure CMY approach. With strict layer validation, a non-destructive workflow, and fine-tuning tools for every channel, it handles the technical heavy lifting so you can focus on getting the best possible output from your artwork.
Try OmniSeps free for 15 days
Automatic color separation for Photoshop & Illustrator. No credit card required.
Claim Free TrialMore articles
Ubah Desain Jadi Halftone untuk DTF dan DTG — Otomatis di Photoshop
Mau hasil DTF dan DTG terlihat seperti sablon manual? OmniSeps konversi artwork PNG jadi halftone yang bisa dikustomisasi — frekuensi, sudut, dan bentuk titik sesuai selera.
Tanda Registrasi untuk Sablon — Otomatis, Bernomor, dan Sadar Arah
Tanda registrasi otomatis untuk film sablon — dihitung dari desainmu, diberi nomor otomatis, dan sadar arah untuk orientasi film apa saja.