Color Separation for Screen Printing — Works With Vector, Raster, or Both
Automatic color separation for screen printing in Photoshop. Works with vector, raster, or mixed layers — with built-in ink order sorting and auto trapping.
8 Mei 2026
Color separation is one of the most technical steps in screen printing. Get it wrong and you get gaps between colors, ink mixing where it shouldn't, or a final print that looks nothing like the original artwork. It's the step that determines whether the job comes out clean or goes back for a reprint.
OmniSeps handles the entire process automatically — and it works with whatever format your design is in.
Designed for Vector, Ready for Raster
Layer Seps is built around the most common screen printing workflow: vector and graphic-style artwork, where each color lives on its own Photoshop layer. Logos, apparel graphics, flat-color illustrations — set up your layers the way you already do, and Layer Seps separates them automatically.
It also handles raster layers and mixed designs — a painted texture, a photographic element, a blended component mixed in with flat colors. Every layer gets its own spot channel regardless of how it was built. If your file contains vector or shape layers, rasterize them first and Layer Seps takes it from there.
Layer Compatibility
Layer Seps — and the preprocessing tools that feed into it (Sort Bright, Merge Color, Knockout) — work with raster layers only. Before running any of these tools, make sure your document contains no non-raster layers.
These layer types block the entire operation — the tool stops and identifies the problem layer:
- Vector / path layers
- Shape layers
- Solid Color fill layers
- Text layers
- Gradient layers
- Pattern layers
Go to Layer > Rasterize > Layer to convert any of these, then run the tool again.
These layer types are automatically skipped — the operation continues without them:
- Locked layers
- Group / LayerSet layers
- Empty layers (zero pixel area)
No Color Limit
Some tools cap out at a fixed number of colors. Layer Seps doesn't. Whether your design has 4 spot colors or 24, every layer becomes its own channel. The separation scales with the job.
Ink Order — Standard or Custom, Your Call
The standard rule in screen printing is light inks first, dark inks last. This ensures proper coverage on dark garments and prevents darker inks from muddying lighter ones underneath. OmniSeps has a dedicated Sort Bright feature that automatically reorders your layers from lightest to darkest with one click — the standard, handled automatically.
But the order is fully customizable. If your design needs a specific print sequence that's different from the standard — a particular creative effect, a shop preference, a client requirement — arrange the layers yourself before running Layer Seps. The separation follows whatever stack you set up. You always have full control over print order.
Starting From a Messy Client File?
Layer Seps works best when the file coming in is already clean — one layer per ink color, no overlapping pixels, layers in the right order. Most client files aren't.
If you're dealing with duplicate color layers, pixel collisions, or a randomly stacked layer order, OmniSeps has a built-in preprocessing pipeline that fixes all of that before Layer Seps runs. Four tools, run in sequence:
- Knockout — removes pixel overlap between layers
- Merge Color — consolidates layers that share the same ink color
- Sort Bright — reorders layers from light to dark
- Layer Seps — runs the full separation
Read the full guide: How to Clean Up Any Client File Before Separation →
What Happens During Separation
Once your layers are ready, Layer Seps runs through the full separation automatically — every step handled without manual intervention.
Color detection
Layer Seps automatically detects the color of each layer directly from Photoshop — no manual color picking needed.
Spot channel creation
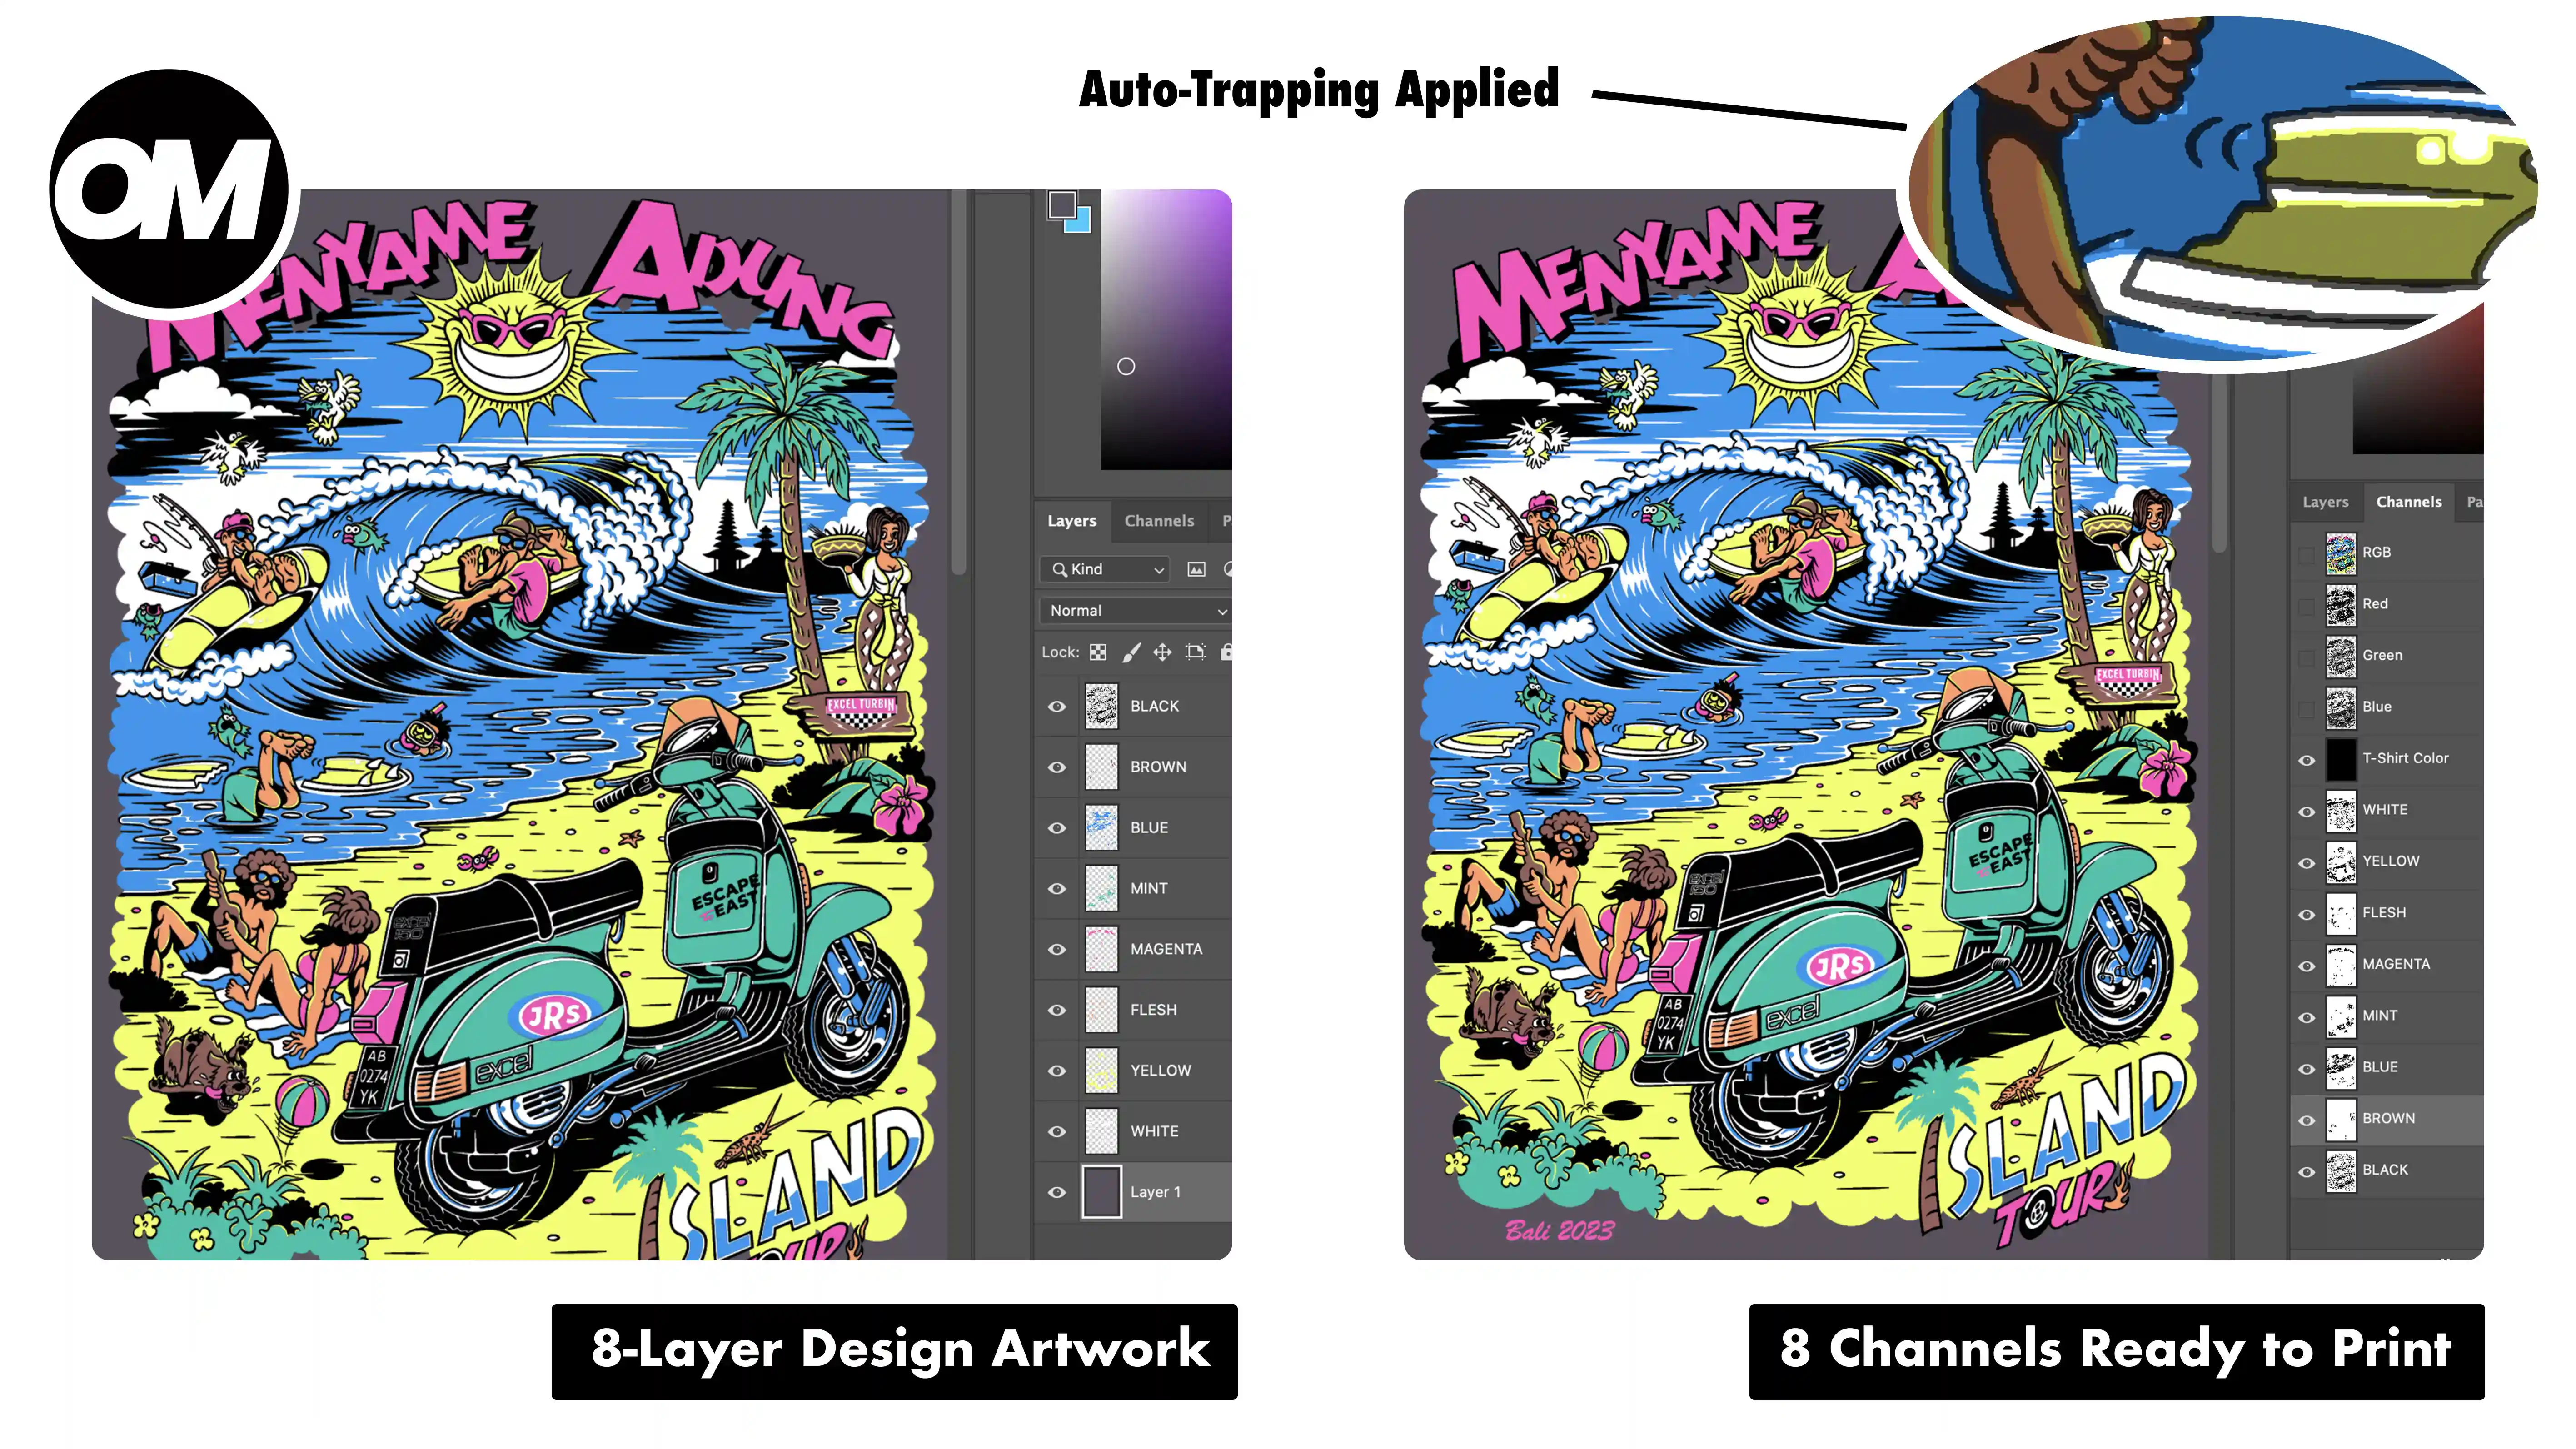
Each layer becomes a dedicated spot channel named after that layer. The channel is built from the layer's own transparency, so the shape is always pixel-accurate to the artwork.
Trapping
Layer Seps expands each spot channel to create an overlap between adjacent colors — preventing white hairline gaps on press from screen misregistration. The expand size is set directly from the Expand input field in the VECTOR tab panel, so you can dial in the trapping amount that works for your press and registration tolerance.
Knockout
Ink on each channel is kept from overlapping during the print process — colors stay accurate and true to the original design. Everything runs automatically with no additional setup needed.
Outer cleanup
Every spot channel is guaranteed clean and tight, covering only the intended design area. No excess ink bleeds outside your artwork boundary.
Mixing Vector and Raster? Add Manual Colors After
If your design combines vector artwork with raster elements and you need to add extra spot color channels on top of what Layer Seps already built — OmniSeps has a manual color separation menu for exactly that.
After Layer Seps finishes, open the manual separation options and add individual color channels one by one. Each color — Blue, Red, Green, Orange, and many more — can be added as a separate spot channel to complement your existing separation. The manual channels stack cleanly on top of what Layer Seps already produced.
This is the workflow for complex mixed designs: let Layer Seps handle the automatic separation first, then extend it manually with whatever extra colors your design needs.
Your Original Design Is Never Touched
Layer Seps is fully non-destructive. Every layer stays exactly as it is throughout the entire process. The MERGED composite is created as a new layer stamped from what's visible — the originals are untouched.
Receive a revision from the client? Update the layers and re-run. You're not rebuilding from scratch.
The Result
When Layer Seps finishes, you have:
- A spot channel for every color in your design, named after each layer
- Trapping applied between every adjacent color
- Clean knockouts — no ink stacking or mixing
- A MERGED composite layer showing the full combined result
- A T-Shirt Color channel for previewing the design on a garment
Everything print-ready. No cleanup required.
Ready to Try It?
Layer Seps and Sort Bright are both built into OmniSeps, a Photoshop plugin designed specifically for screen printing.
FAQ
What type of designs work with Layer Seps?
Any design where each ink color is on its own Photoshop layer. If your artwork comes from vector objects — from Illustrator, CorelDraw, or any vector tool — rasterize the layers in Photoshop first before running Layer Seps. Once rasterized, Layer Seps handles everything automatically. Mixed raster designs work the same way.
Is there a color limit?
No. Layer Seps processes every layer in the document. 4 colors or 24, every layer gets its own spot channel.
Can I use a custom ink order instead of light-to-dark?
Yes. Light-to-dark is the standard and Sort Bright handles it automatically, but the order is fully customizable. Arrange your layers in any sequence before running Layer Seps and the separation follows your stack exactly.
Can I adjust the trapping size?
Yes. The expand size used for trapping is customizable. Set it to match your press tolerance and registration capability.
What is trapping in screen printing?
Trapping is an overlap between adjacent colors that prevents white hairline gaps from appearing when screens shift slightly on press. Layer Seps applies this automatically to every edge, with a customizable expand amount. Not sure what trapping size to use for your setup? Use the OmniSeps Trapping Calculator to find the right value for your press.
What is knockout in screen printing?
Knockout means each color removes the area of colors beneath it so inks don't stack and blend on press. Layer Seps calculates and applies all knockouts automatically based on your layer stack.
Does Layer Seps change my original layers?
No. Layer Seps is fully non-destructive. All original layers are untouched. The MERGED layer is created separately as a composite — your source layers are never modified.
What if I receive a messy client file with overlapping layers or duplicates?
OmniSeps has a 4-step preprocessing pipeline for exactly that. Read the full guide →
Try OmniSeps free for 15 days
Automatic color separation for Photoshop & Illustrator. No credit card required.
Claim Free TrialMore articles
Ubah Desain Jadi Halftone untuk DTF dan DTG — Otomatis di Photoshop
Mau hasil DTF dan DTG terlihat seperti sablon manual? OmniSeps konversi artwork PNG jadi halftone yang bisa dikustomisasi — frekuensi, sudut, dan bentuk titik sesuai selera.
Tanda Registrasi untuk Sablon — Otomatis, Bernomor, dan Sadar Arah
Tanda registrasi otomatis untuk film sablon — dihitung dari desainmu, diberi nomor otomatis, dan sadar arah untuk orientasi film apa saja.