Simulated Process Screen Printing Separation — S1 and S2 in OmniSeps
One click and your full simulated process separation is built automatically. S1 for standard color range, S2 for extended palette with warm tones and skin tones. Fine-tune per channel with built-in adjustment tools.
9 Mei 2026
Simulated process separation is how screen printers reproduce full-color raster artwork — photographs, detailed illustrations, complex gradients — using a fixed set of spot color inks. Instead of printing actual CMYK, each ink is a real mixed color that together simulates the full image on the garment.
OmniSeps automates this entirely. One click and all your separation channels are built, ready for bitmap conversion and film output.
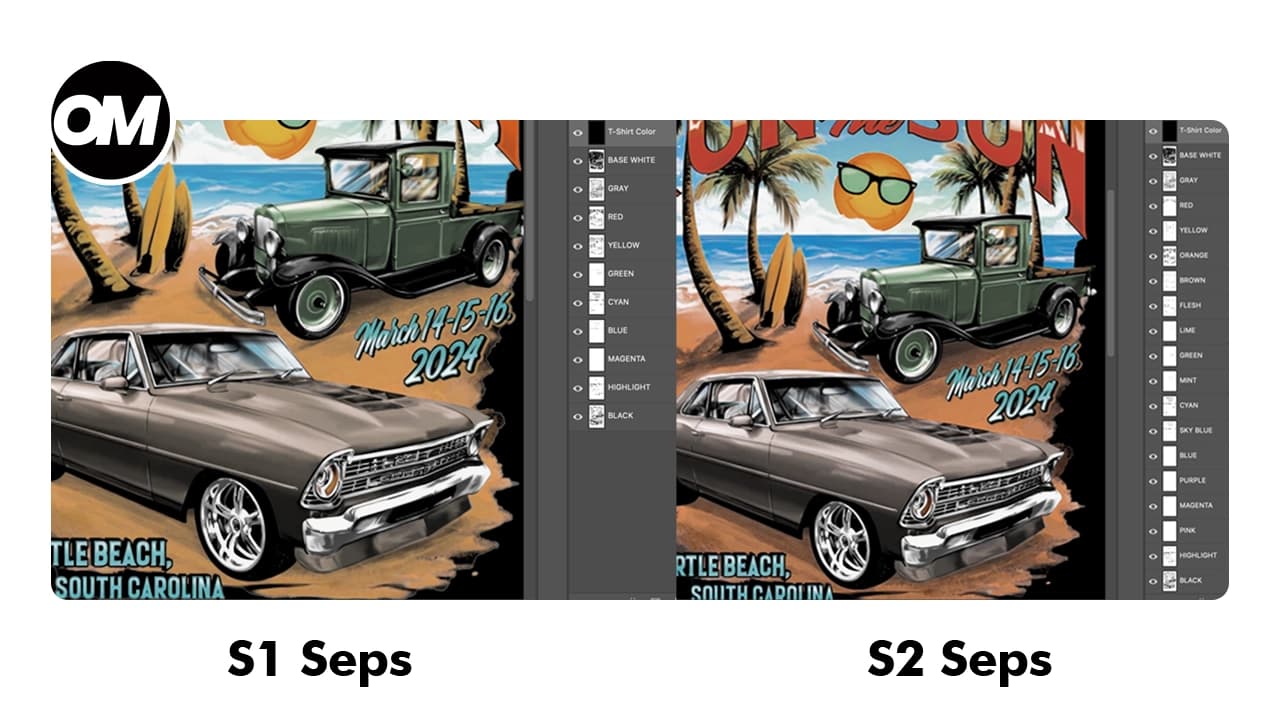
S1 — Standard Color Set
S1 is the standard simulated process separation. It creates the following channels automatically:
BASE WHITE, GRAY, RED, YELLOW, GREEN, CYAN, BLUE, MAGENTA, HIGHLIGHT, BLACK
This covers the core color range needed for most simulated process artwork. If your design doesn’t rely heavily on warm tones, skin tones, or extended palette colors, S1 is the right choice — cleaner, fewer screens, faster turnaround.
S2 — Extended Color Set
S2 builds on S1 with a wider palette for artwork that demands more color nuance. It creates all S1 channels plus additional colors:
BASE WHITE, GRAY, RED, YELLOW, ORANGE, BROWN, FLESH, LIME, GREEN, MINT, CYAN, SKY BLUE, BLUE, PURPLE, MAGENTA, PINK, HIGHLIGHT, BLACK
What S2 adds over S1: ORANGE, BROWN, FLESH, LIME, MINT, SKY BLUE, PURPLE, PINK
S2 is the choice for complex artwork with warm tones, skin tones, rich earth tones, or designs that need the full extended color range to reproduce accurately on press.
Which One Should You Use?
The rule is straightforward:
- Artwork with limited colors, cool tones, or minimal warm range → S1
- Artwork with skin tones, warm colors, earth tones, or complex multi-color range → S2
More channels means more screens on press. S1 is the efficient option when the extended palette isn’t needed. S2 is the right tool when the artwork demands it.
Fine-Tuning After Separation — Adjustment Tools
Automatic separation doesn’t always nail every channel perfectly on the first run. Ink density might be too heavy on one channel, edges might spread too wide, or shadow areas might appear where they shouldn’t. OmniSeps includes a set of adjustment tools to fix this channel by channel.
Select the channel you want to adjust first — all tools work on one channel at a time.
Ink + — increase ink density on the selected channel. Use when the color looks too faint or thin in the preview.
Ink - — reduce ink density. Use when a channel has too much ink and is muddying other colors.
Tone + — removes unwanted shadow areas from the channel, cleaning up dark pixels that don’t belong.
Tone - — pulls more detail into the highlight areas of the channel.
Choke — tightens the channel edges by shrinking coverage. Useful when a channel is spreading into neighboring colors.
Spread — expands channel edges for wider coverage. Use when a channel isn’t quite reaching where it needs to go.
Brightness/Contrast — opens the Photoshop Brightness/Contrast dialog for free-form manual adjustment on the selected channel.
Levels — opens the Photoshop Levels dialog for precise tonal range control on the selected channel.
These tools give you surgical control over each separation channel without re-running the entire separation. Adjust the problem channel, preview the result, and move on.
Mixing Raster and Vector in One Separation
S1 and S2 are designed to work alongside vector separations — so you can combine a vector graphic with a raster element in a single file and separate both in one workflow.
The workflow:
- Run the vector separation first — using KnockLayer or OmniChange Separation
- Rename those vector channels to numbers (1, 2, 3... up to 17)
- Run S1 or S2 — OmniSeps automatically skips any channel already named 1–17 and builds the raster channels below them
The final channel stack in the Channels panel from top to bottom:
- 1, 2, 3... (vector channels — untouched)
- BASE WHITE, GRAY, RED... (raster channels from S1/S2)
Each part stays in its own lane. Vector channels handle the graphic elements, raster channels handle the photographic or painted elements.
Important: No Layer Merge
For raster × vector mix to work correctly, your raster and vector layers must not be merged together. OmniSeps treats every layer as independent — vector operations and raster operations must run separately on their own layers.
If layers are still merged, separate them manually before running S1 or S2. Depending on your design, the vector layer should remain on its own, and the raster layer should stay independent. There's no single right answer — it depends on the design. The important thing is that vector and raster layers are kept apart before the separation runs.
FAQ
What is simulated process screen printing?
Simulated process is a method of reproducing full-color raster artwork using a set of spot inks. Each ink is a real mixed color — not CMYK — and together they simulate the appearance of the full image on the garment. It’s the standard approach for printing photographs and complex illustrations on dark shirts.
What’s the difference between S1 and S2?
S1 uses a standard color set covering the core range. S2 extends this with additional colors — Orange, Brown, Flesh, Lime, Mint, Sky Blue, Purple, and Pink — for artwork that needs a wider palette, accurate warm tones, or skin tones.
When should I use S1 and when S2?
S1 for artwork with limited colors and no heavy warm or skin tones. S2 for complex artwork with warm colors, earth tones, or skin tones that S1 can’t reproduce well enough. More channels means more screens — only go S2 when the artwork needs it.
Can I mix vector and raster in the same separation?
Yes. Run the vector separation first, rename those channels to numbers (1–17), then run S1 or S2. OmniSeps skips the numbered channels and builds the raster channels below them automatically.
Why do I need to rename vector channels to numbers?
OmniSeps uses the channel name to determine what to skip. Channels named 1–17 are treated as already-processed vector channels and left untouched. Any other name gets processed by S1/S2.
What happens if my raster and vector layers overlap?
Resolve the collision manually before running S1 or S2. OmniSeps assumes layers are independent. Cut the overlapping area — either the vector trims the raster or the raster gets cut where the vector sits — depending on which element should be on top in the final print.
What do the adjustment tools do?
They let you fine-tune individual channels after separation without re-running the entire process. Increase or reduce ink density, clean up shadow areas, adjust highlights, tighten or expand channel edges, or open Photoshop’s Brightness/Contrast and Levels dialogs for manual control. Select one channel, apply the adjustment, and move on.
Do I need S2 for every design?
No. S2 is for artwork that genuinely needs the extended palette. For most standard simulated process work, S1 covers the range. Use S2 when your artwork has skin tones, warm earth tones, or colors that S1 can’t reproduce well enough.
Try OmniSeps free for 15 days
Automatic color separation for Photoshop & Illustrator. No credit card required.
Claim Free TrialMore articles
Ubah Desain Jadi Halftone untuk DTF dan DTG — Otomatis di Photoshop
Mau hasil DTF dan DTG terlihat seperti sablon manual? OmniSeps konversi artwork PNG jadi halftone yang bisa dikustomisasi — frekuensi, sudut, dan bentuk titik sesuai selera.
Tanda Registrasi untuk Sablon — Otomatis, Bernomor, dan Sadar Arah
Tanda registrasi otomatis untuk film sablon — dihitung dari desainmu, diberi nomor otomatis, dan sadar arah untuk orientasi film apa saja.