What is Trapping in Screen Printing — and How OmniSeps Handles It
Learn what trapping is in screen printing, why it matters for press registration, and how OmniSeps handles it automatically — without ever changing your original design.
9 Mei 2026
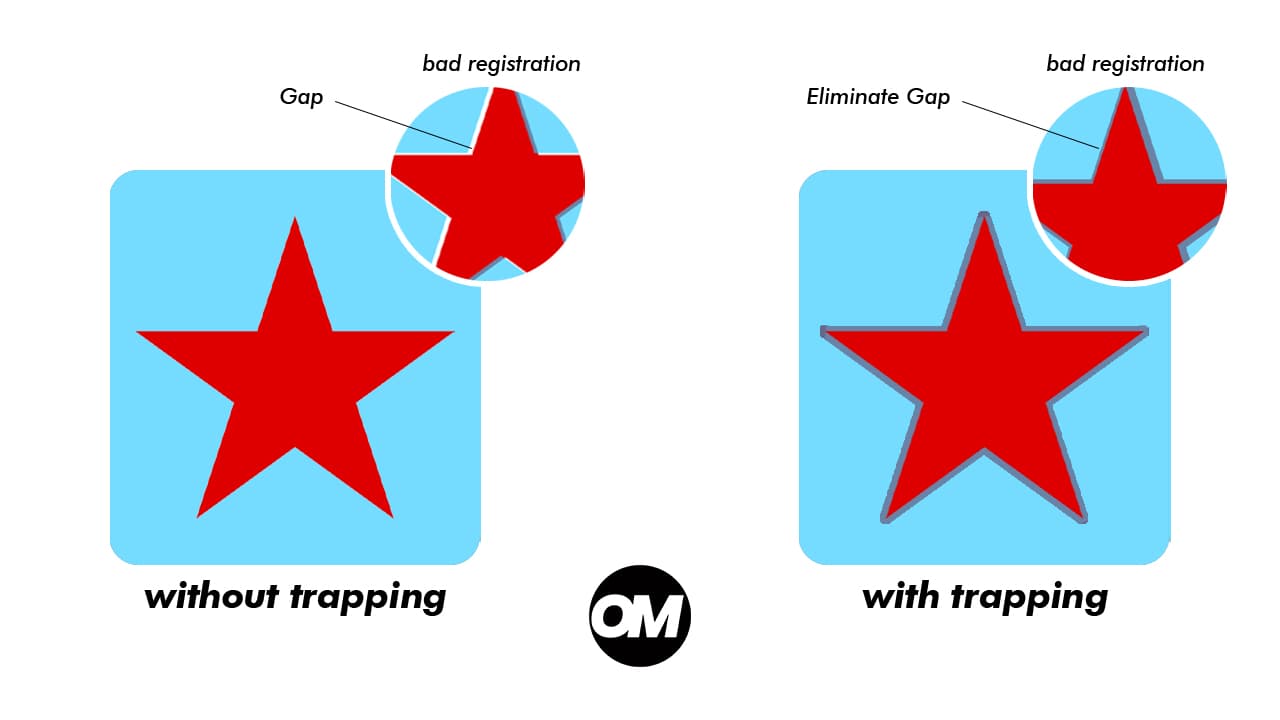
Every screen printer who has run a multi-color job knows the problem: the press is never perfectly aligned on every print. Even a fraction of a millimeter of misregistration between screens can leave a thin gap between two adjacent colors — a visible white hairline that was not in the original artwork. That gap is the problem trapping is designed to prevent.
What is Trapping?
Trapping is the practice of slightly expanding one color into the boundary of an adjacent color, so that when misregistration occurs on press, the two colors overlap slightly rather than leaving a gap.
Without trapping, two colors that sit edge-to-edge in the artwork will show a gap the moment the screens are even slightly out of alignment. With trapping, the expanded edge of one color slides under the neighboring color, and the overlap absorbs the misregistration invisibly.
In screen printing, trapping is especially critical for:
- Multi-color designs on dark garments where misregistration exposes the shirt color
- Fine text or thin lines sitting next to other colors
- Designs with tight registration requirements
The amount of trapping needed depends on the press, the mesh count, and the operator's registration tolerance. A high-quality automatic press with tight registration needs minimal trapping. A manual press printing on stretchable fabric may need more.
How Much Trapping Do You Need?
There is no universal answer — trapping amount varies by press type, substrate, and production conditions. OmniSeps provides a Trapping Calculator to help you determine the right expand value for your specific setup:
Enter your press variables and the calculator returns a recommended trapping size in pixels, ready to plug directly into OmniSeps.
Trapping Never Changes the Original Design
No matter how large the trapping value, OmniSeps preserves every detail of the original artwork exactly as submitted. Trapping expansion works between adjacent colors — it creates overlap inward so gaps cannot appear on press. Anything that goes outside the original design boundary is automatically cleaned up. The result: the customer's design stays intact, detail for detail, with trapping applied invisibly underneath.
You can set any trapping value freely without worrying about distorting the artwork or losing fine details.
How OmniSeps Handles Trapping
OmniSeps has trapping built into multiple points of the workflow, giving you options at every stage:
Automatic Trapping in KnockLayer
When you run KnockLayer to separate a layered design into spot color channels, trapping is applied automatically as part of the separation process. Each color channel is expanded outward before the knockout is applied, so the final channels already have the correct overlap built in.
The expand size is fully customizable — you set the pixel value before running KnockLayer, and every channel in the separation receives that trapping amount. No manual channel-by-channel work required.
Auto Run — Trapping for OmniChange Workflow
For users coming from OmniChange, trapping is also built into the Auto Run flow. After channels are brought in from OmniChange, Auto Run applies the same expand-then-cut-outer sequence automatically — trapping is applied, anything outside the design boundary is cleaned up, knockout is processed, and colors are assigned — all in one step.
The trapping value is selected directly from the VECTOR tab panel using the Expand number input field. Pick the value that matches your press tolerance before running.
Expand Smart — Manual Trapping After Separation
After a separation is complete, you may find that specific channels need additional trapping, or that you want to apply trapping to a file that was not processed through KnockLayer. Expand Smart is the tool for that.
Expand Smart works in two modes depending on what you have selected in the Channels panel:
Expand a specific channel — select the channel you want to trap in the Channels panel, then run Expand Smart. Only that channel is expanded by the specified pixel amount.
Expand all channels at once — if you are in the RGB composite view (no specific channel selected), Expand Smart expands every spot channel in the document simultaneously by the same amount. This is useful for applying uniform trapping across an entire separation in one step.
The expand amount is set by you before running — use the Trapping Calculator to determine the right value for your press.
Trapping at Different Workflow Stages
Frequently Asked Questions
How do I know how many pixels of trapping to use?
Use the OmniSeps Trapping Calculator at omniseps.com/calculator. It factors in your press conditions and returns a recommended pixel value.
Will trapping change or distort the customer's design?
No. OmniSeps applies trapping between adjacent colors only. The original design — every edge, every fine detail — is preserved exactly as submitted. No shapes are altered and nothing outside the original artwork boundary is left in the output.
Does trapping affect the visible print when registration is perfect?
Minimal trapping — 1 to 2 pixels at typical print resolution — is generally not visible when registration is good. The overlap sits under the neighboring color and is hidden.
Should I trap before or after separation?
If you are using KnockLayer, trapping is applied automatically during separation — you do not need to do it separately. If you are working with channels from another workflow, use Expand Smart after the separation is done.
Can I expand all channels at once?
Yes. In Expand Smart, if no specific channel is selected (you are in RGB composite view), the tool expands all spot channels in the document simultaneously by the same amount.
Does Spread in the adjustment panel do the same thing as Expand Smart?
Both expand a channel outward, but Spread applies exactly 1 pixel per click and works on one channel at a time. Expand Smart lets you set a specific pixel amount and can process all channels at once.
Conclusion
Trapping is one of the most practical quality controls in screen printing production. OmniSeps makes it accessible at every stage of the workflow — automatic during KnockLayer separation, manual via Expand Smart, and fine-tunable per channel with Spread — all without ever touching the original artwork.
Try OmniSeps free for 15 days
Automatic color separation for Photoshop & Illustrator. No credit card required.
Claim Free TrialMore articles
Ubah Desain Jadi Halftone untuk DTF dan DTG — Otomatis di Photoshop
Mau hasil DTF dan DTG terlihat seperti sablon manual? OmniSeps konversi artwork PNG jadi halftone yang bisa dikustomisasi — frekuensi, sudut, dan bentuk titik sesuai selera.
Tanda Registrasi untuk Sablon — Otomatis, Bernomor, dan Sadar Arah
Tanda registrasi otomatis untuk film sablon — dihitung dari desainmu, diberi nomor otomatis, dan sadar arah untuk orientasi film apa saja.